-
CyPath® Lung Sputum Collection
PURPOSE
To establish proper protocol for preparation and transportation of Sputum for flow cytometry testing.
POLICY
Expected turnaround time (TAT) for routine specimens is 48-72 hours from time of receipt at laboratory.Following procedures as defined in the validation of CyPath® Lung assay, specimen integrity is maintained if:
-Sputum sample is collected for a period of 3-5 consecutive days.
-Sputum is refrigerated between daily collections.
-Frozen Cold Brick is added to the CyPath® Lung Sample Collection Kit with the specimen for FedEx pick-up and shipping.
CAP FLO.30430QC
The most important steps in the collection of sputum for flow cytometric acquisition and analysis are proper expulsion of mucus from the lungs and refrigeration of the specimen. If sputum is not from the lungs or refrigerated during collection, the acquisition and analysis of the specimen is compromised or lost. It is critical that patients have a proper understanding of the sputum collection process to avoid repeat submission(s) of samples due to compromised or invalid acquisition and analysis testing.Materials
CyPath® Lung Sputum Sample Collection Kit:
-Kit Box
-Assist Device
-Cold Brick
-Collection Cup
-Plastic Bag with absorbent sheet
-FedExPak
–CyPath® Flow Cytometry Lung Cancer Test- Step-by-Step Illustrated Instructions
-Assist Device IFU: Acapella Vibratory PEP Therapy SystemProcedure
Sputum Preparation for Flow Cytometric Acquisition and Analysis
1. Proper expulsion of sputum from the lungs is necessary for:
a. Collection of sputum containing lung cancer cells, if present, identified by CyPath® Lung testing.
b. Capture of requisite alveolar macrophages for confirmation that sputum was submitted from the lungs.2. Refrigeration is necessary to:
Preserve cellular viability.
3. Client Submission Instruction
To maximize accurate patient specimen identification and reporting of sputum analysis results, the person handling the specimen kit, prior to releasing the kit to patient, should:
a. Pre-label the Sputum Sample Collection Cup, found in the CyPath® Lung Sputum Sample Collection Kit, with at least two identifiers at the time of collection (i.e. Unique barcode, requisition number, unique random number, patient’s full name).
b. Fill out the Reference Requisition, ensuring unique barcode and second unique patient identifier correctly match those recorded on the collection cup label.
c. Ensure the collection cup is placed back into the collection kit before giving the kit to the patient.
d. Record on patient requisition the date and time collection kit is given to the patient.
e. Fax the requisition or place it in an inter-departmental mail envelope and place in the designated specimen pick-up area.
f. According to the facility’s courier set-up, call for requisition pick-up or wait for the scheduled pick-up time.4. Sputum Collection and Submission Instructions (Preformed by Patient)
1. Preparation for Sputum Sample Collection
a. Follow CyPath® Flow Cytometry Lung Cancer Test- Step-by-Step Illustrated Instruction.
b. Call 885-MY LUNGS (855-695-8647) for any questions about the use of this test.
c. The collection kit comes with an assist device (acapella). This is a device that assist the patient in the collection of sputum.
d. Remove the Cold Brick from the collection kit and put in the freezer.
e. Keep the kit box in a safe place to return the sample.
2. Collection of Sputum
a. Rinse mouth with water before collection.
b. Remove collection cup from the kit box and collection assist device from its packaging.
c. Place collection cup and assist device nearby prior to sample collection.
d. Unscrew the lid of the collection cup.
e. Breathe deeply from the chest ten times, then seal lips around the assist device mouthpiece.
f. Breathe in and out deeply ten times through the mouth, keeping lips sealed around the mouthpiece.
Repeat as often as desired.
Note: Refer to Acapella Vibratory PEP Therapy System insert, found in the assist device bag, for more detailed instructions. Do not expel sputum into the device. All sputum should be expelled into the Sputum Sample Collection Cup.
g. Cough deeply from the chest, making a “huff” sound to bring up the sputum. Expel the sputum into the collection cup. Repeat 3-5 times.
Note: Collection can be preformed several times during the day if thick mucus secretions are not seen. Collecting after a warm morning shower helps loosen the sputum for collection.
h. After collection, screw the lid onto the collection cup and wash your hands. Always wash your hands before and after handling the collection cup.
i. Put the sputum sample in the refrigerator (NOT the freezer) each day after collecting the sample.
j. Collect the sputum sample in the same cup for three days of collection, collection may be performed an additional two days.
k. Fill out collection schedule at the back of the CyPath® Flow Cytometry Lung Cancer Test- Step-by-Step Illustrated Instructions booklet each day for return with the sample.
l. After third day of collection, tightly screw on the lid to the collection cup and prepare for FedEx pick-up.
3. Collection Kit Preparation and Return Shipping
a. Retrieve collection kit box. Remove the clear Bio-Protective plastic bag with absorbent sheet and pre-addressed FedExPak.
b. Place collection cup into the plastic bag with the absorbent sheet. Push air out of bag and seal.
c. Remove FROZEN COLD BRICK from the freezer and place the cold brick in the kit box.
d. Place the sample cup (in its bag) in the kit box. Place the frozen cold brick next to sample in the box and close the box.
e. Place box in the pre-addressed FedExPak mailing envelope provided in the kit.
f. Call 800.GoFedEx (1.800.463.3339) or go to fedex.com to schedule free pick-up.References
CyPath® Lung Sputum Sample Collection Kit- Patient Instructions for Use. Precision Pathology Services, bioAffinity Technologies, Inc. -
Collection Manual Overview
PURPOSE
To establish proper protocol for the collection and transportation of patient specimens for routine Laboratory Diagnostic Performance.POLICY
To educate the Clinician and Laboratory Staff of the pre-analytical steps when collecting and handling specimens for Anatomic Pathology and/or Microbiology examination. Upon each client set-up, the Client will be educated on specimen collection and transport packaging. Orientations will be documented and stored in the client’s file.
GEN.40050QC
1. All specimen containers are to be labeled with at least two identifiers at the time of collection (Patient’s full name is required; second identifier can be DOB).
2. Individual slides are to be labeled with two unique identifiers. Slide holders do not serve as the “specimen container”.
3. CyPath® Lung collection cups are to be labeled with at least two identifiers at the time of collection (e.g., Unique barcode, requisition number, unique random number, patient’s full name).
4. Microbiology, Molecular, Gynecological, and CyPath® Lung secondary specimen contianers (Aptima devices, microcentrifuge and centrifuge tubes dissociation vessels, conical tubes, flow tubes.) are labeled with at least one unique identifier.
5. Liver Specimens should be accompanied with all current liver function tests (LFTs).
6. Breast Specimens should be accompanied with mammography and ultrasound.
7. Breast Specimens should be fixed in 10% neutral buffered formalin for at least six hours before processing, and no longer than seventy-two hours as a pre-analytical step for the purposes of breast prognostic indicator testing.PROCEDURE
A. Requisitions
Attached to the properly fixed specimen should be a completed Request for pathology services requisition. The requisition form should provide information as needed for a correct interpretation of the specimen, including the pre- and post- operative diagnosis and clinical data.
ALWAYS PRINT when filling out the Specimen Requisitions.
1. Precision Pathology has seven types of Requisitions.
– Surgical Pathology Requisition
– Hospital Pathology Requisition
– Hematopathology Requisition
– Gastroenterology Requisition
– Women’s Health Requisition
– Molecular Requisition
– Reference/Technical Requisition
2. Required Sections of the Requisition:
a. Patient Information Sections
– Patient Name
– Date of Birth
– Social Security Number
– Account Number
– Sex
– Age
– Insurance Documentation (may be attached to Requisition, please indicate)
b. ICD-10 Code
c. Specimen Information section
– Collection Date
– Collection Time
d. Requesting Physician section
Mark the patient’s specimen-collecting Physician along with any copy-to Physician(s).
e. Pre-Operative Diagnosis
Fill in the Pre-op Diagnosis section. Patient History can be included in this section.
f. Comments Section
The laboratory does not have access to the Patient’s Medical Record. Please include the following information to help assist in giving the most accurate diagnosis for the Patient:
– Did the Patient have surgery?
– Is this a routine test?
– Did the patient have radiation or chemotherapy?
– Did the patient have abnormal biopsies in the past?
– Does the patient have a history of cancer?
– For Bone Marrow patients, please include any blood testing results.B. Transportation
1. Specimens should be kept and stored in the clinic’s designated area to await transportation by Logistics Technician or overnight mail to the Laboratory for processing.
2. All specimens should be transported inside of a designated rigid specimen transport container within the Logistics Technician vehicle. Specimens should not be transported loosely inside the Logistics Technician vehicle.
3. Specimens are not to be transported in extreme temperatures and all measures should be taken to
maintain specimen viability.
4. In case of an accident while transporting biohazards, Precision Pathology Services is to be called immediately and the Medical Director is to be notified.
5. Transportation occurrences which affect specimen quality should be reported to the Operations Director
immediately. The occurrence will be investigated and documented. Transport occurrences require Quality Improvement (QI).C. Requests for Technical Only Aspects
1. Specimen Processing
a. Follow the Routine Specimen Collection instructions.
b. Notate on the Requisition in RED the technical aspect being requested.
– Processing
– Process and Embed
– Process, Embed, Microtomy – list the number of slides and how many sections on each slide
– Process, Embed, Microtomy, staining – list the requested stains
– Other – Be very specific. Call the laboratory to consult with a Histotechnician if needed.
2. Microscope Slide Staining
a. Tissue Fixative should be Neutral Buffered Formalin. If any other fixative type is used, call the lab to inquire if staining will work.
b. Slides are to be positive-charged.
c. Sections are to be picked up on positive-charged slides from a Distilled Water Bath
d. Sections are to be placed 15mm below the frosted cover and at least 5mm from the bottom edge of the glass, microscope slide. Do not let the tissue go closer than 5mm from the bottom edge of the slide.
e. Slides are to contain two unique patient identifiers.
f. Do not dry slides in the oven. Send the slides to the laboratory directly from the water bath in a plastic or cardboard slide transport container.
g. For each stain requested, send four slides.REFERENCES
Carson, F.L., Histotechnology A Self-Instructional Text, 2nd ed., ASCP Press, Chicago, 1997, pp. 80-111.
Sheehan, D.C. and Hraphak, B.B.: Theory and Practice of Histotechnology, 2nd ed., 1980, Mosby Company, St. Louis.
Gomella, L.G. and Haist, S.A.: Clinician’s Pocket Reference, 2002, McGraw Hill Company inc., United States of America.CAP Checklist, June 2010 GEN.40050, GEN.40100, GEN.40104, GEN.40108, GEN.40116, GEN.40125, GEN.40491, GEN.40500, GEN.40511, GEN.40515, GEN.40522, GEN.40700
CLIA Regulation, 1989.Texas Administrative Code Title 25, Part 1, Subchapter K
-
Specimens Not Accepted
Purpose
To establish a protocol for identifying specimens not accepted at Precision Pathology Services.Procedure
A. Radioactive Material
Precision Pathology Services DOES NOT ACCEPT radioactive material; which may include Sentinel Lymph Nodes, Breast Biopsies, Prostate “Seeds” etc. (PPS Staff see Procedure 5.3 for handling instructions)
Note: During routine facility visits, if requested, pathologists will remove radioactive seeds from tissue specimens and give the seeds to the facility for storage or disposal. The tissue will then be submitted to PPS by the facility per routine protocols.B. FRESH Tissue that is Positive or Suspicious for HEPATITIS B, C, HIV, or TUBERCULOSIS:
Precision Pathology Services DOES NOT ACCEPT fresh Hepatitis B, C, HIV, or TB specimens. Due to exposure risk, these specimens must be submitted to the lab in 10% Neutral Buffered Formalin or Bouin’s fixative. Peripheral Blood smears need to be performed at the Client’s site on these specimens.C. Creutzfeldt-Jakob Disease
The lab does not accept any specimen suspected of Creutzfeldt-Jakob disease, including brain or cerebrospinal fluid.
PPS staff, see Lab Gen Procedure 5.4 for further reference.D. Agents of Bioterrorism
The lab does not accept any specimens suspected of containing agents of bioterrorism.
See procedure 7011. MIC. 18968References
Roby Joyce, MD FCAP. Precision Pathology Services Medical Director, CEO, President -
Return Request Specimens
Purpose
To establish a protocol for handling specimens which have been requested for return.QC
Communication with the laboratory is vital to ensure proper handling and turnaround of any return request.
Client Services for the laboratory can be reached at 210-646-0890.Procedure
A. Request for Body Part Returned
Patients requesting body parts to be returned may be done by following the Texas Administrative Code Title 25 Part 1, Subchapter K.
– Human materials removed during surgery, labor and delivery, autopsy, embalming, or biopsy shall be subjected to proper disposal method per Texas Admin Code Title 25.
– PPS Staff, see Client Services for TX Admin Code 25 reference materials.- Call PPS at 210-646-0890 on any specimen for which a return is requested.
- Fill out the requisition completely for submission to pathology. Ensure that there are clear notes on what the doctor is requesting (e.g. Gross exam, processing, special testing), and that there is a note that a return has been requested on the specimen.
- If the body part is being requested back for burial, please send fresh.
- Wrap the body part securely and place in a sturdy container/box for transport. Label the wrapping, and the container with the patient’s information.
- Place the body part with the paperwork in a refrigerator until courier pick-up.
- Hardware may be submitted in formalin, and does not require refrigeration.
- Fill out the Specimen Logbook.
- Fill out the Precision Pathology Services release form. PPS can fax over a release form upon initial call (step 1) if needed.
- Fax, or send release form with specimen to PPS.
- Specimens will only be released to a funeral home. Funeral Home arrangements and fees are the patient’s responsibility.
B. Request for Fetus Release
Parents requesting fetus to be returned may be done by following the Texas Administrative Code Title 25 Part 1, Subchapter K.
– Human materials removed during surgery, labor and delivery, autopsy, embalming, or biopsy shall be subjected to proper disposal method per Texas Admin Code Title 25.- Call PPS at 210-646-0890 on any fetal remain for which a return is requested.
- Fill out the requisition completely for submission to pathology. Ensure that there are clear notes on what the doctor is requesting (e.g. Gross exam, autopsy, special testing), and that there is a note that a return has been requested on the specimen.
- Attach Labor/Delivery notes and/or ER notes. (Any information is helpful.)
- Wrap the fetus securely and place in a sturdy container/box for transport. Label the wrapping, and the container with the patient’s information.
- Place the fetus with the paperwork in a refrigerator until courier pick-up.
- Fill out the Specimen Logbook.
- Fill out Precision Pathology Services release form. PPS can fax over a release form upon initial call (step 1) if needed.
- Fax, or send release form with specimen to PPS.
- Fetal remains will only be released to a funeral home. Funeral Home arrangements and fees are the patient’s responsibility.
C. Request for Returns (General)
Any biohazardous substance collected and sent for pathology must follow the Texas Admin Code Title 25 Part 1, Subchapter K. e.g. Hardware, gallstones, etc
Call PPS at 210-646-0890 upon collection for guidance. -
Tissue Submission for General Histology
PURPOSE
To establish proper protocol for routine Histology processing.POLICY
Expected turnaround time (TAT) for routine histologic and non-GYN cytologic specimens is 24-48 hours.QC
The most important step in the histological exam is Fixation. If a specimen is improperly fixed, the histology of the tissue is compromised or lost. Because many histologic samples cannot be recovered or repeated, it is critical for everyone involved with the tissue specimen to have a working understanding of fixation.PROCEDURE
Tissue Preparation for General Histology
1. The fixative of choice for Histology is 10% Neutral Buffered Formalin (NBF) for transportation from Collecting Facility to Laboratory.
2. Formalin is used to:
a. Prevent autolysis (cell self-destruction from enzymes)
b. Prevent putrefaction (bacterial destruction of the cell)
c. To harden the tissue (make tissue easier to handle)
d. To kill infectious agents.
3. In order to maximize accurate results for tissue examination, the person handling the original specimen should:
a. Pre-label the specimen containers with Patient Name, DOB, Collection Date, and Collection Site.
b. Put the specimen in 10% NBF as soon as it is removed from the patient. This must not wait until the procedure is over. Small specimens are especially susceptible to autolysis and putrefaction.
c. Completely cover the specimen with 10% NBF. A 1:20 ratio (size of specimen to formalin) is ideal. This is especially crucial for large specimens.
d. Seal the container and check for leaks. Formalin is a caustic chemical and should be handled with care. Double check containers to confirm they are all labeled with the Patient Name, DOB, Collection Date, and Collection Site.
e. Fill out the Pathology Requisition.
Note: Breast specimens must have the Cold Ischemic Time and Fixation Time filled out on the Requisition.
f. Place the container with the requisition in a specimen transportation bag and place in the designated specimen pick-up area.
g. According to the facility’s courier set-up, call for a pick-up or wait for the scheduled pick-up time. -
Amputation of Large Appendages
PURPOSE
To establish proper packaging and transport for Large Appendages.POLICY
Expected turnaround time (TAT) for routine histologic and non-GYN cytologic specimens is 24-48 hours.QC
For safe transport, it is important that the appendage is properly prepared.
All sharp areas and exposed bone are to be covered well to avoid injury to transport personnel.PROCEDURE
1. Cover the transected bone with an absorbent pad (e.g. thick gauze, cloth), to prevent sharp edges from perforating the containing bag.
2. Place the appendage inside a red biohazard bag (or similar transport bag) and wrap tightly around the appendage. Tape firmly closed.
3. Label the wrapped appendage with patient information. If this wrapping is not labeled, the specimen is not considered properly labeled by CAP and CLIA regulations.
4. Place the wrapped appendage into a brown biohazard box. Tape firmly closed.
5. Place the box inside another red biohazard bag. Tie or tape closed.
6. Make sure the completed requisition and accompanying paperwork are with the specimen. It is preferred to put the paperwork in a small bag and tape that bag to the bagged box containing the appendage.
7. Have the specimen in the designated pick-up area for the courier to retrieve.
If refrigeration is available, refrigerate the appendage at 4°C until courier pick-up.
Note: If the patient or family would like to request this appendage to be returned for burial, make a note on the requisition stating the request and contact information for the hospital staff member to contact. If a note is not made on the requisition, laboratory staff may not store the appendage in a manner appropriate for burial.
See Collection Procedure 3000.2 Return Request Specimens for further details on how to send specimens with a request for return. -
Breast Tissue Submission
PURPOSE
To establish proper protocol for routine breast tissue specimens submitted for anatomic pathology analysis and diagnostics.POLICY
Expected turnaround time (TAT) for routine specimens is 24-48 hours.QC
The most important step in the histological exam is Fixation. If a specimen is improperly fixed, the histology of the tissue is compromised or lost. Because many histologic samples cannot be recovered or repeated, it is critical for everyone involved with the tissue specimen to have a working understanding of fixation.PROCEDURE
Tissue Preparation for General Histology
Fixatives of choice for Histology are:
– 10% Neutral Buffered Formalin for transportation from Collecting Facility to Laboratory.
– RPMI for specimens (e.g. Lymph Nodes) processed for genetic testing
– One drop of Saline on fresh specimens
1. Fixatives are used to:
a. Prevent autolysis (cell self-destruction from enzymes)
b. Prevent putrefaction (bacterial destruction of the cell)
c. To harden the tissue (make tissue easier to handle)
d. To kill infectious agents.
2. In order to maximize accurate results for tissue examination, the person handling the original specimen should:
a. Pre-label the specimen containers with Patient Name, DOB, Collection Date, and Collection Site.
b. Put the specimen in fixative as soon as it is removed from the patient. This must not wait until the procedure is over. Small specimens are especially susceptible to autolysis and putrefaction.
c. Completely cover the specimen with fixative. A 1:20 ratio (size of specimen to formalin) is ideal. This is especially crucial for large specimens.
d. Seal the container and check for leaks. Formalin is a caustic chemical and should be handled with care. Double check containers to confirm they are all labeled with the Patient Name, DOB, Collection Date, and Collection Site.
e. Fill out the Pathology Requisition. Breast specimens must have the Cold Ischemic Time and Fixation Time filled out on the Requisition.
f. Place the container with the requisition in a specimen transportation bag and place in the designated specimen pick-up area.
g. According to the facility’s courier set-up, call for a pick-up or wait for the scheduled pick-up time. -
Gastric Tissue Submission
PURPOSE
To establish proper protocol for routine gastric tissue specimens submitted for anatomic pathology analysis and diagnostics.POLICY
Expected turnaround time (TAT) for routine specimens is 24-48 hours.QC
The most important step in the histological exam is Fixation. If a specimen is improperly fixed, the histology of the tissue is compromised or lost. Because many histologic samples cannot be recovered or repeated, it is critical for everyone involved with the tissue specimen to have a working understanding of fixation.PROCEDURE
Tissue Preparation for General Histology
Fixatives of choice for Histology are:
10% Neutral Buffered Formalin for transportation from Collecting Facility to Laboratory.
RPMI for specimens (e.g. Lymph Nodes) processed for genetic testing
One drop of Saline on fresh specimens
1. Fixatives are used to:
a. Prevent autolysis (cell self-destruction from enzymes)
b. Prevent putrefaction (bacterial destruction of the cell)
c. To harden the tissue (make tissue easier to handle)
d. To kill infectious agents.
2. In order to maximize accurate results for tissue examination, the person handling the original specimen should:
a. Pre-label the specimen containers with Patient Name, DOB, Collection Date, and Collection Site.
b. Put the specimen in fixative as soon as it is removed from the patient. This must not wait until the procedure is over. Small specimens are especially susceptible to autolysis and putrefaction.
c. Completely cover the specimen with fixative. A 1:20 ratio (size of specimen to formalin) is ideal. This is especially crucial for large specimens.
d. Seal the container and check for leaks. Formalin is a caustic chemical and should be handled with care. Double check containers to confirm they are all labeled with the Patient Name, DOB, Collection Date, and Collection Site.
e. Fill out the Pathology Requisition. Gastric specimens must have the Cold Ischemic Time and Fixation Time filled out on the Requisition.
f. Place the container with the requisition in a specimen transportation bag and place in the designated specimen pick-up area.
g. According to the facility’s courier set-up, call for a pick-up or wait for the scheduled pick-up time. -
Skin Tissue Submission
PURPOSE
To establish proper protocol for routine skin tissue specimens submitted for anatomic pathology analysis and diagnostics.POLICY
Expected turnaround time (TAT) for routine specimens is 24-48 hours.QC
The most important step in the histological exam is Fixation. If a specimen is improperly fixed, the histology of the tissue is compromised or lost. Because many histologic samples cannot be recovered or repeated, it is critical for everyone involved with the tissue specimen to have a working understanding of fixation.PROCEDURE
Tissue Preparation for General Histology
Fixatives of choice for Histology are:
10% Neutral Buffered Formalin for transportation from Collecting Facility to Laboratory.
One drop of Saline on fresh specimens
1. Fixatives are used to:
a. Prevent autolysis (cell self-destruction from enzymes)
b. Prevent putrefaction (bacterial destruction of the cell)
c. To harden the tissue (make tissue easier to handle)
d. To kill infectious agents.
2. In order to maximize accurate results for tissue examination, the person handling the original specimen should:
a. Pre-label the specimen containers with Patient Name, DOB, Collection Date, and Collection Site.
b. Put the specimen in fixative as soon as it is removed from the patient. This must not wait until the procedure is over. Small specimens are especially susceptible to autolysis and putrefaction.
c. Completely cover the specimen with fixative. A 1:20 ratio (size of specimen to formalin) is ideal. This is especially crucial for large specimens.
d. Seal the container and check for leaks. Formalin is a caustic chemical and should be handled with care. Double check containers to confirm they are all labeled with the Patient Name, DOB, Collection Date, and Collection Site.
e. Fill out the Pathology Requisition.
f. Place the container with the requisition in a specimen transportation bag and place in the designated specimen pick-up area.
g. According to the facility’s courier set-up, call for a pick-up or wait for the scheduled pick-up time. -
Nail Trimmings Submission
PURPOSE
To establish proper protocol for routine nail trimmings specimens submitted for anatomic pathology analysis and diagnostics.POLICY
Expected turnaround time (TAT) for routine histologic and non-GYN cytologic specimens is 24-48 hours.QC
The most important step in the histological exam is Fixation. If a specimen is improperly fixed, the histology of the tissue is compromised or lost. Because many histologic samples cannot be recovered or repeated, it is critical for everyone involved with the tissue specimen to have a working understanding of fixation.PROCEDURE
1. Submit nail trimmings in the following collection devices:
a. Dry in cup or sealed bag. Recommended and preferred.
b. In formalin.
Note: If submitted in formalin or in a container just emptied of formalin, the specimen cannot be processed for any kind of microbiological testing at all.
2. In order to maximize accurate results for tissue examination, the person handling the original specimen should:
a. Pre-label the specimen containers with Patient Name, DOB, Collection Date, and Collection Site.
b. Put the specimen into the collection container immediately after removal.
c. Seal the container and check for openings/tears/leaks. Double check containers to confirm they are all labeled with the Patient Name, DOB, Collection Date, and Collection Site.
e. Fill out the Pathology Requisition.
f. Place the container with the requisition in a specimen transportation bag and place in the designated specimen pick-up area.
g. According to the facility’s courier set-up, call for a pick-up or wait for the scheduled pick-up time. -
Axillary Lymph Nodes Submission
PURPOSE
To establish proper protocol for routine lymph node specimens submitted for anatomic pathology analysis and diagnostics.POLICY
Expected turnaround time (TAT) for routine specimens is 24-48 hours.QC
The most important step in the histological exam is Fixation. If a specimen is improperly fixed, the histology of the tissue is compromised or lost. Because many histologic samples cannot be recovered or repeated, it is critical for everyone involved with the tissue specimen to have a working understanding of fixation.PROCEDURE
Tissue Preparation
1. The submission reagent depends on the testing being requested:
a. For General Histology – 10% Neutral Buffered Formalin (NBF)
b. For Genetic Testing – RPMI
c. Fresh Specimen for Genetic Testing – One drop of Saline in a sterile container. More than a single drop will hinder specimen test results.
2. In order to maximize accurate results for tissue examination, the person handling the original specimen should:
a. Pre-label the specimen containers with Patient Name, DOB, Collection Date, and Collection Site.
b. Put the specimen in fixative or with a drop of saline as soon as it is removed from the patient. This must not wait until the procedure is over. Small specimens are especially susceptible to autolysis and putrefaction.
c. If using 10% NBF or RPMI, completely cover the specimen with fixative. A 1:20 ratio (size of specimen to formalin) is ideal. This is especially crucial for large specimens. Do not cover specimens with saline. More than a single drop will hinder specimen test results.
d. Seal the container and check for leaks. Formalin is a caustic chemical and should be handled with care. Double check containers to confirm they are all labeled with the Patient Name, DOB, Collection Date, and Collection Site.
e. Fill out the Pathology Requisition. Specimens must have the Cold Ischemic Time and Fixation Time filled out on the Requisition.
f. Place the container with the requisition in a specimen transportation bag and place in the designated specimen pick-up area.
g. According to the facility’s courier set-up, call for a pick-up or wait for the scheduled pick-up time. -
All Other Lymph Nodes Submission
PURPOSE
To establish proper protocol for routine lymph node specimens submitted for anatomic pathology analysis and diagnostics.POLICY
Expected turnaround time (TAT) for routine specimens is 24-48 hours.QC
The most important step in the histological exam is Fixation. If a specimen is improperly fixed, the histology of the tissue is compromised or lost. Because many histologic samples cannot be recovered or repeated, it is critical for everyone involved with the tissue specimen to have a working understanding of fixation.PROCEDURE
Tissue Preparation
1. The submission reagent depends on the testing being requested:
a. For General Histology – 10% Neutral Buffered Formalin (NBF)
b. For Genetic Testing – RPMI
c. Fresh Specimen for Genetic Testing – One drop of Saline in a sterile container. More than a single drop will hinder specimen test results.
2. In order to maximize accurate results for tissue examination, the person handling the original specimen should:
a. Pre-label the specimen containers with Patient Name, DOB, Collection Date, and Collection Site.
b. Put the specimen in fixative or with a drop of saline as soon as it is removed from the patient. This must not wait until the procedure is over. Small specimens are especially susceptible to autolysis and putrefaction.
c. If using 10% NBF or RPMI, completely cover the specimen with fixative. A 1:20 ratio (size of specimen to formalin) is ideal. This is especially crucial for large specimens. Do not cover specimens with saline. More than a single drop will hinder specimen test results.
d. Seal the container and check for leaks. Formalin is a caustic chemical and should be handled with care. Double check containers to confirm they are all labeled with the Patient Name, DOB, Collection Date, and Collection Site.
e. Fill out the Pathology Requisition. Specimens must have the Cold Ischemic Time and Fixation Time filled out on the Requisition.
f. Place the container with the requisition in a specimen transportation bag and place in the designated specimen pick-up area.
g. According to the facility’s courier set-up, call for a pick-up or wait for the scheduled pick-up time. -
Bone Marrow Specimens
PURPOSE
To establish a protocol for handling bone marrow specimens.QC
Expected TAT: 24-172 hours (depending on testing needed)
The Clinician will receive a Preliminary Diagnosis call from the Pathologist within 24 hours of specimen receipt.PROCEDURE
A. Specimen Preparation
Kit Contents:
2 bottles Bouin’s Fixative | 1 Cold Pack | 2 slide containers, each containing 5 slides | 1 Specimen Bag | 1 Purple Top containing EDTA | 1 Instruction Sheet | 1 Green Top containing Sodium Heparin | 1 Transport Box1. A Bone Marrow study usually consists of an aspirate and biopsy, or just an aspirate.
Always be specific about the sampling site (right or left posterior iliac crest or sternum).
2. The optimal amount of aspirate is 4-5mL. A portion of the aspiration is used at the bedside to make 4-6 particle crush smears.
a. To create a particle crush smear, particles should be placed in the center of the glass slide.
b. Another slide is positioned directly over the first slide, and the two slides are gently placed together and then pulled apart in a plane parallel to their surfaces.
i. These smears should be quickly air-dried.
ii. Direct smears of the aspirate prior to clotting are also helpful. These are made as you would a Peripheral Blood Smear (see below).
c. At least 1-2 mL of aspirate is to be placed in the purple top (EDTA) tube and at least 0.5 – 1mL of aspirate should be placed in the green top (sodium heparin) tube.
d. The remainder of the aspirate is allowed to clot and then is placed in one of the containers of Bouin’s Fixative.
3. The trephine biopsy should immediately be gently imprinted (touched) several times per slide on two or three glass slides to make trephine imprints. Air dry these immediately. Place the biopsy in the second container of Bouin’s fixative.B. Specimen Submission
1. A copy of the CBC and one or two unstained peripheral blood smears or tube of peripheral blood should be accompanying the bone marrow. If no peripheral blood was obtained, finger stick smears are acceptable.
2. Special Studies that will be performed as necessary on the marrow are the following:
a. Chromosome (Cytogenetic) Studies: Performed on 0.5 – 1.0 mL of unclotted aspirate in a sodium heparin tube. Maintain at room temperature.
b. Flow Cytometry: Place at least 1-2mL of marrow aspirate in EDTA tube. Maintain at room temperature.
c. FISH: FISH may be performed on the same sample (sod hep tube) sent for chromosome studies.
d. Molecular Diagnostics: Includes polymerase chain reaction (PCR) and Southern blot analysis. These may be performed on the same (EDTA) tube sent for Flow Cytometry.
e. Cultures: A second aspirate is required for cultures, in order to maintain sterility.
Aspirate about 5mLs into syringe, remove needle, and cap. Usual studies done are aerobic/anaerobic, acid fast, and fungal cultures.
3. When the marrow is prepared for transport:
a. Be sure ALL SLIDES AND CONTAINERS ARE LABELED WITH THE PATIENT’S NAME and COLLECTION DATE. Indicate the date and time the clot and biopsy were placed in fixative on the requisition.
b. Be sure to close containers tightly to omit any specimen leaks, or specimen destruction. The fumes of the Bouin’s fixative have the ability to destroy the slide specimens.
c. Place the dried slides into the plastic slide containers for protection. The slides must be thoroughly dry before placing in the plastic containers to prevent artifact.
d. Place the bottles of Bouin’s fixative into the provided plastic bag. Seal the bag to eliminate any fumes from escaping.
e. Insert all items back into the Bone Marrow Kit Box.4. Enclosed paperwork should include:
– Most recent CBC results
– Patient Demographic information
– Hematopathology Requisition containing:
• Patient’s age and/or date of birth
• Diagnosis (if known)
• Specific site of the Biopsy
• Requesting physician name(s)
• Any Special Studies requested
Always Print when filling out specimen requisitions, and do not use colored inks or pencils.
5. Questions? Please call Dr. Peggy Stoll direct at 210-757-8399 or at Precision Pathology Services at 210-646-0890.
6. Send to: Please call Precision Pathology Services to arrange a specimen pick-up. -
Renal Biopsy Submission
PURPOSE
To establish a protocol for handling renal biopsy specimens.PROCEDURE
Note: Multiple cores are recommended for transplants
1. Single Core/Scant Material
a. Submit 1mm cubes from both ends of core for Electron Microscopy (EM).
b. Submit 2/3 of remaining core for Light Microscopy (LM), and 1/3 for Immunofluorescence (IF).
Note: If the submitted core shows limited glomeruli, the core is to be divided the core into two halves and submit each half in both LM and IF only.
2. Two Cores
a. Submit 1mm cubes from the ends of both cores for EM.
b. Divide the remaining material from both cores into halves.
c. Submit one half from the first core and one half from the second core for LM.
d. Submit remaining halves from both cores for IF.
3. Three or More Cores
a. Submit one entire core with adequate glomeruli for LM.
b. Submit 1mm cubes from the ends of the remaining cores for EM.
c. Submit remaining renal tissue for IF.
4. Submit in a PPS Renal Biopsy Kit to the laboratory for processing.
5. Enclosed paperwork should include:
a. PPS Requisition, fully completed
b. Renal Clinical Data Sheet, fully completed -
Gout Submission
PURPOSE
To establish a protocol for handling gout specimens.POLICY
Expected turnaround time (TAT) for routine gout specimens is 24-48 hours.QC
Never submit gout specimens in saline. The gout crystals will dissolve.
Never submit gout specimens in formalin.PROCEDURE
1. In order to maximize accurate results for Pathology, the person collecting and handling the original specimen should pre-label a 95% ETOH (alcohol) Container with:
Patient’s Name
Collection Date
Collection Site.
This specimen MUST NOT BE SUBMITTED INTO FORMALIN.
This specimen may be submitted fresh, without any fixative or moisturizing agent, but 95% ETOH produces better results.
2. Insert the specimen into the container. Close the container and tighten the lid.
3. According to the facility’s courier set-up, call for a pick-up or wait for the scheduled pick-up time. -
Flow Cytometry Submission
PURPOSE
To establish a protocol for correct preparation of flow cytometry specimens.POLICY
Expected turnaround time (TAT) for routine flow specimens is 24-48 hours.QC
This specimen MUST NOT BE SUBMITTED INTO FORMALIN.PROCEDURE
Specimen Preparation for Flow Cytometry
In order to maximize accurate results for Flow Cytometry, the person collecting and handling the original specimen should:
1. Pre-label a container of RPMI with the Patient’s Name, Collection Date, Collection Time, and Collection Site.
2. Insert the specimen into the pre-labeled container.
3. Seal the container and insert it into a specimen transport bag with a cold (not frozen) pack.
4. Fill out a Patient Surgical Requisition and insert it into the side pocket of the specimen transport bag.
5. Hold the specimen in a 4° Celsius refrigerator until the courier arrives for pick-up.
6. Call Precision Pathology at 210-646-0890 for a “STAT” pick-up and let them know you have a FRESH Specimen in RPMI for Flow Cytometry. -
Muscle Biopsy for Enzyme Studies Submission
PURPOSE
To establish a protocol for handling muscle biopsy for enzyme studies specimens.POLICY
The expected turnaround time (TAT) for routine muscle for enzyme study specimens is seven (7) business days.QC
1. Muscle Biopsies for Enzyme Studies receive optimal patient test results when testing begins within one hour of collection.
2. Procedures should be scheduled for a no later than 14:00 pick-up time, due to time constraints on specimen processing.
3. City traffic and specimen travel time should be considered when scheduling the patient for biopsy.
4. If located outside the 1604 loop, muscle biopsy procedures must be scheduled with PPS in advance, so a Histotechnician can be on-site for immediate specimen handling.
5. When scheduling in advance, a PPS courier will bring all transport materials and stand by to transport the specimen.PROCEDURE
1. Call the Laboratory at 210-646-0890 at least 24 hours in advance of the procedure to ensure the Laboratory has a courier on stand-by to pick up the specimen STAT.
2. Select a muscle that is neither asymptomatic, nor end stage.
3. For proximal weakness, biceps or quadriceps are preferred.
4. For distal weakness, brachioradialis or anterior tibial muscle tissue is preferred.
5. Never biopsy the gastrocnemius muscle in children. Gastrocnemius biopsies are only acceptable in adults.
6. Do not biopsy a muscle recently needled by electromyography or injected with medication.
7. Infiltrate the skin with anesthesia, but do not infiltrate the muscle tissue.
8. Incise the skin and muscle fascia. Retract the skin, exposing the muscle tissue.
9. As atraumatically as possible, by blunt dissection, longitudinally separate several fascicles (at least 5mm across) to greater than the width of the muscle biopsy clamp.
10. Insert the muscle biopsy clamp onto the muscle. Close the clamp tight enough to hold the muscle in place, to prevent contraction.
11. Incise the muscle outside the edges of the clamp, leaving at least 1mm on each edge outside the clamp.
12. Keep the specimen in the muscle clamps.
13. The specimen should be put into a small, pre-labeled, container with two-three drops of saline. DO NOT SUBMERGE specimen in saline.
14. Then, place the smaller container into the larger container and pack ice around the smaller container. Be sure the smaller container is labeled with two patient identifiers (including full patient name).
15. Hand the specimen directly to the PPS Courier for delivery to the laboratory STAT, without any delays.
Note: Both specimen containers must be labeled with two patient identifiers (patient’s full name, and one other identifier, such as date of birth). Be certain the requisition is completely filled out with all pertinent information. -
Hirschsprung's Disease Submission
PURPOSE
To establish a protocol for handling Hirschsprung’s Disease specimens.PROCEDURE
1. Materials Needed
a. Telfa Pad
b. Saline
c. Sterile container
A container emptied of fixative is not suitable for this specimen.
2. Procedure
a. Place the fresh specimen on a “taco” of telfa pad that has been soaked in saline.
b. Place the telfa taco into a sterile container.
Do not add fixative. A container emptied of fixative is not suitable for this specimen.
c. Make sure the specimen container is labeled with two, unique patient identifiers. (e.g. Patient’s full name, and date of birth)
d. Put the container on ice.
e. Call for a STAT pick-up: 210-646-0890
Note: The laboratory can only accept specimens for Hirschsprung’s between 0800 and 1530, Monday through Friday. Call the Laboratory with any questions. -
Nerve Biopsy Submission
PURPOSE
To establish a protocol for handling nerve biopsy specimens.MATERIALS
Centrifuge Tube – Large
Tongue Blade
10% Neutral Buffered Formalin (NBF)
Glutaraldehyde (for Electron Microscopy)QC
Procedures should be scheduled for a no later than 14:00 pick-up time, due to time constraints on specimen processing.
NOTE: If located outside the 1604 loop, nerve biopsy procedures must be scheduled with PPS in advance, so a Histotechnician can be on-site for immediate specimen handling.PROCEDURE
1. Submit 3cm of sural/posterior tibial nerve (or less of peroneal/other sensory diminishing nerve), sutured at each end and affixed to a longitudinally-split portion of tongue blade with a notch at each end, so the nerve is lying straight.
Do not stretch or freeze nerve. Results will be very suboptimal.
2. Place the tongue blade with specimen into the centrifuge tube and fill enough to cover with 10% NBF.
3. If Electron Microscopy (EM) is requested, place a small portion of the specimen into the glutaraldehyde.
4. Label the specimen container with two unique patient identifiers (patient’s full name, and one other identifier, such as date of birth).
5. Be certain the requisition is completely filled out with all pertinent information.
6. Call PPS at 210-646-0890 for a STAT pick up. -
Fine Needle Aspiration (FNA) Submission
PURPOSE
To establish proper protocol for routine histologic/non-GYN cytologic specimens collected by Fine Needle Aspiration (FNA).POLICY
Expected turnaround time (TAT) for routine histologic and non-GYN cytologic specimens is 24-48 hours.QC
The most important step in the histological exam is Fixation. If a specimen is improperly fixed, the histology of the tissue is compromised or lost. Because many histologic samples cannot be recovered or repeated, it is critical for everyone involved with the tissue specimen to have a working understanding of fixation. Although Saccomanno Fluid is the preference of our Pathologist Team, CytoRich Red may be used as a temporary substitution.PROCEDURE
1. The FNA Kit consists of:
Three 50mL tubes, partially filled with Saccomanno fluid
Each tube is for a single specimen, allowing for three cases per kit.
2. Saccomanno is used to:
a. Prevent autolysis (cell self-destruction from enzymes)
b. Prevent putrefaction (bacterial destruction of the cell)
c. To harden the tissue (make tissue easier to handle)
d. To kill infectious agents.
e. Prevents the tissue from drying out.
3. FNA Collection:
a. Estimate the amount of the Specimen and pour out any excess Saccomanno from the 50mL tube to create a 50/50 ratio.
b. Eject the Specimen into the 50mL container of Saccomanno, maintaining a 50/50 ratio of specimen to fixative.
c. A minimum of 30mL of Specimen is preferred. Sending the entire Specimen is ideal.
Note: This method can be used for an FNA of any site.
If a core biopsy is collected, insert it into a 20mL formalin vial and follow normal biopsy collection procedures.
Do not send sharps to the laboratory. Always remove needles from syringes. Never send a syringe containing a needle to any laboratory.
4. In order to maximize accurate results for cytology testing, the person collecting and handling the original specimen should:
a. Pre-label all FNA Kit containers and slides. Individual slides must be labeled with a minimum of one patient identifier, and the slide holder must be labeled with a minimum of two patient identifiers. (e.g. Full Name and Birthdate)
b. Seal the container(s) after specimen has been inserted and check for leaks. Double check the containers and slides to confirm they are all labeled with the Patient Name, DOB, Collection Date, and Collection Site.
c. Fill out the Pathology Requisition.
d. Place the container(s) in the sealable portion of a specimen transportation bag and place in the requisition in the side pocket. Then place specimen transport bag in designated specimen pick-up area.
e. According to the facility’s courier set-up, call for a pick-up or wait for the scheduled pick-up time. -
Urine Specimen Preparation for Cytology Submission
PURPOSE
To establish proper protocol for routine urine cytology specimens.POLICY
Expected turnaround time (TAT) for routine histologic and non-GYN cytologic specimens is 24-48 hours.QC
The most important step in the histological exam is Fixation. If a specimen is improperly fixed, the histology of the tissue is compromised or lost. Because many histologic samples cannot be recovered or repeated, it is critical for everyone involved with the tissue specimen to have a working understanding of fixation.PROCEDURE
1. The fixatives of choice are Reagent Alcohol, Saccomanno, or CytoRich Red.
2. Reagent fixatives are used to:
a. Prevent autolysis (cell self-destruction from enzymes)
b. Prevent putrefaction (bacterial destruction of the cell)
c. To harden the tissue (make tissue easier to handle)
d. To kill infectious agents.
e. Prevents the tissue from drying out.
3. Urine Specimen Preparation for Cytologic Review
a. Have the patient urinate into a urine catch cup labeled with their name.
b. Receive the specimen from the patient in the labeled catch cup.
c. Pre-label the specimen transportation container with the Patient Name, Collection Date, and “Urine” for the Site.
d. Pour the specimen into the Pre-labeled specimen transportation container, leaving room for the fixative to be added. Specimen/Fixative ratio should be 1:1, (equal amounts of each).
e. Pour fixative into specimen transportation container (25ml); ensure ratio of specimen to fixative is 1:1.
f. Apply the lid to the transport container and tighten. Double check specimen transport container for Patient Name, Collection Date, and “Urine” as Collection Site.
g. Completely fill out the Precision Pathology Requisition. Make sure to include whether the Urine is voided, catheter-collected, or other.
h. Put specimen and requisition in specimen bag for transportation.
i. According to the facility’s courier set-up, call for a pick-up or wait for the scheduled pick-up time.
NOTE: Any questions regarding a specimen or its fixation should be directed to the Laboratory
Director. -
Other Non-GYN Body Fluid Submission
PURPOSE
To establish proper protocol for routine /non-GYN cytologic specimens, excluding urine.POLICY
Expected turnaround time (TAT) for routine histologic and non-GYN cytologic specimens is 24-48 hours.QC
The most important step in the histological exam is Fixation. If a specimen is improperly fixed, the histology of the tissue is compromised or lost. Because many histologic samples cannot be recovered or repeated, it is critical for everyone involved with the tissue specimen to have a working understanding of fixation.For Urine specimen collection and transport, see procedure 3011.100.
PROCEDURE
Small Quantities
(e.g. bile duct brushings, bronchial brushings, cyst fluid aspiration, bronchoalveolar lavage fluid, etc)
1. The fixative of choice is CytoRich Red (CRR).
Note: Fresh specimens for HIV, TB, HepB or HepC are not accepted at the Laboratory. The specimen must be placed in fixative.
2. CRR should be added to all fluid immediately after collection for optimal results.
a. Estimate the amount of the Specimen and pour out any excess CytoRich Red from the 50mL tube to create a 50/50 ratio.
b. Eject the Specimen into the 50mL container of CytoRich Red, maintaining a 50/50 ratio of specimen to fixative.
c. A minimum of 30mL of Specimen is preferred. Sending the entire Specimen is ideal.
3. For specimens sent to the Laboratory the same day, the specimen may be sent fresh. The specimen is to be kept refrigerated until pick-up.
Large Quantities
(e.g. Ascites, pleural fluid)
1. Large quantities of fluid should be sent fresh and in the entire quantity collected. The specimen is to be kept refrigerated until pick-up.
2. At minimum, the first liter (1L) should be submitted in a glass container. All other quantities may be submitted in whichever container is used for collection. Glass reduces artifact from the container.
3. The maximum quantity of any fluid specimen submitted to pathology is two (2) liters. PPS does not store and/or dispose of specimen waste for clients.
All Quantities
In order to maximize accurate results for cytology testing, the person collecting and handling the original specimen should:
1. Pre-label all containers and slides. Individual slides are to be labeled with a minimum of two unique patient identifiers, and the slide holder is also to be labeled with a minimum of two patient identifiers. (e.g. Full Name and Birthdate)
2. Seal the container(s) after specimen has been inserted and check for leaks. Double check the containers and slides to confirm they are all labeled with the Patient Name, DOB, Collection Date, and Collection Site.
3. Fill out the Pathology Requisition. PPS does not store and/or dispose of specimen waste for clients.
If the specimen does not come with a requisition containing a pathology testing order, the specimen will be returned.
4. Place the container(s) in the sealable portion of a specimen transportation bag and place in the requisition in the side pocket. Then place specimen transport bag in designated specimen pick-up area.
5. According to the facility’s courier set-up, call for a pick-up or wait for the scheduled pick-up time -
Immunohistochemistry and Special Stains for Formalin-Fixed Paraffin Embedded Tissue
PURPOSE
To establish proper protocol for preparation and transport of immunohistochemistry (IHC) and special stains requests on formalin-fixed paraffin embedded tissue (FFPET).POLICY
Expected turnaround time (TAT) for routine specimens is 24-48 hours.PROCEDURE
A. Submission Instructions
In order to maximize accurate results for tissue examination, the person handling the original specimen should:
1. Pre-label the specimen slides and slide container(s) with Patient Name, DOB, and Collection Date.
2. Fill out the Reference Requisition.
3. Place the slide container with the requisition in a specimen transportation bag and place in the designated specimen pick-up area.
4. According to the facility’s courier set-up, call for a pick-up or wait for the scheduled pick-up time.B. For Laboratory Technical Performance
1. For each requested stain, provide two (2) unstained slides (USS) cut at four (4) microns.
2. For Congo Red specifically, provide two USS cut at seven (7) microns.C. For Laboratory Technical Performance and Diagnostic Reporting
1. For each requested stain, provide two (2) unstained slides (USS) cut at four (4) microns.
2. For Congo Red specifically, provide two USS cut at seven (7) microns. -
HER2 Neu IHC for Breast Specimens
PURPOSE
To establish proper protocol for preparation and transport of HER2 by IHC stains requests on breast tissue.POLICY
Expected turnaround time (TAT) for routine specimens is 24-48 hours.PROCEDURE
A. Submission Instructions
In order to maximize accurate results for tissue examination, the person handling the original specimen should:
1. Pre-label the specimen slides and slide container(s) with Patient Name, DOB, and Collection Date.
2. Fill out the Reference Requisition.
3. Place the slide container with the requisition in a specimen transportation bag and place in the designated specimen pick-up area.
4. According to the facility’s courier set-up, call for a pick-up or wait for the scheduled pick-up time.B. For Laboratory Technical Performance
1. Provide a paraffin block with embedded breast tissue.
2. Provide five (5) unstained slides (USS) cut at four to five (4-5) microns.
3. Provide one (1) H&E stained slide with the tissue circled.
4. Provide the related Pathology Report for the specimen.C. For Laboratory Technical Performance and Diagnostic Reporting
Submit all of the following for testing:
1. Provide a paraffin block with embedded breast tissue.
2. Provide five (5) unstained slides (USS) cut at four to five (4-5) microns.
3. Provide one (1) H&E stained slide with the tissue circled.
4. Provide the related Pathology Report for the specimen. -
HER2 FISH for Breast Specimens
PURPOSE
To establish proper protocol for preparation and transport of HER2 by FISH stains requests on breast tissue.POLICY
Expected turnaround time (TAT) for routine specimens is 24-48 hours.PROCEDURE
A. Submission Instructions
In order to maximize accurate results for tissue examination, the person handling the original specimen should:
1. Pre-label the specimen slides and slide container(s) with Patient Name, DOB, and Collection Date.
2. Fill out the Reference Requisition.
3. Place the slide container with the requisition in a specimen transportation bag and place in the designated specimen pick-up area.
4. According to the facility’s courier set-up, call for a pick-up or wait for the scheduled pick-up time.B. For Laboratory Technical Performance
1. Provide a paraffin block with embedded breast tissue OR
2. Provide four (4) unstained slides (USS) cut at four (4) microns, air-dried.
If available:
3. Provide one (1) H&E stained slide with the tissue circled.
4. Provide one (1) HER2 Neu by IHC slide.
5. Provide one (1) ER slide.
6. Provide one (1) PR slide.C. For Laboratory Technical Performance and Diagnostic Reporting
1. Provide a paraffin block with embedded breast tissue OR
2. Provide four (4) unstained slides (USS) cut at four (4) microns, air-dried.
If available:
3. Provide one (1) H&E stained slide with the tissue circled.
4. Provide one (1) HER2 Neu by IHC slide.
5. Provide one (1) ER slide.
6. Provide one (1) PR slide. -
EGFR Molecular Testing
PURPOSE
To establish proper protocol for preparation and transport of Tissue and Plasma for molecular testing.POLICY
Expected turnaround time (TAT) for routine specimens is 24-48 hours.PROCEDURE
A. Submission Instructions
In order to maximize accurate results for tissue examination, the person handling the original specimen should:
1. Pre-label the specimen slides and slide container(s) with Patient Name, DOB, and Collection Date.
2. Fill out the Reference Requisition.
3. Place the slide container with the requisition in a specimen transportation bag and place in the designated specimen pick-up area.
4. According to the facility’s courier set-up, call for a pick-up or wait for the scheduled pick-up time.B. Sample Types
1. Tissue Submission
a. Provide a paraffin block
b. Provide four (4) unstained slides (USS) cut at five (5) microns.
c. Provide one (1) tissue curl cut at five (5) microns minimum submitted in a 1.5mL conical tube. Three (3) curls is preferred.
If available:
d. Provide one (1) H&E stained slide.
2. Plasma Submission
Provide two (2) 4mL EDTA tubes with whole blood OR
4mL Plasma Separated within eight (8) hours of collection.
Note: Plasma is always to be kept cool. If shipping specimens, a cold pack is required. -
Chromosome Analysis Specimen Submission
PURPOSE
To establish a protocol for handling chromosome analysis specimens.POLICY
Expected turnaround time (TAT) for routine chromosome analysis specimens is 2-3 weeks.QC
In order to maximize accurate results for Chromosome Analysis, the person collecting and handling the original Product(s) of Conception (POC) specimen should:
Pre-label an empty dry biopsy container with:
1. Patient’s Name
2. Collection Date
3. Collection Time
4. Collection Site.PROCEDURE
Monday-Thursday
1. Moisten a piece of gauze with saline.
2. Wrap the piece of gauze very loosely around the specimen.
3. Insert the specimen into the specimen container.
4. Seal the container and insert it into a specimen transport bag.
5. Fill out a Patient Surgical Requisition and insert it into the side pocket of the specimen transport bag.
6. Hold the specimen in a 4° Celsius refrigerator until the courier arrives for pick-up.
7. In-town: Call Precision Pathology at 210-646-0890 and let them know you have a FRESH Specimen for Cytogenetics.
Rural: If the normal courier pick-up time is missed, hold the specimen in a 4° Celsius refrigerator until the next day pick-up.
This specimen MUST NOT BE SUBMITTED IN FORMALIN.Friday
1. Place the specimen in a dry specimen container.
2. Cover the specimen in RPMI.
3. Seal the container and insert it into a specimen transport bag.
4. Fill out a Patient Surgical Requisition and insert it into the side pocket of the specimen transport bag.
5. Hold the specimen in a 4° Celsius refrigerator until the courier arrives for pick-up.
6. Call the Laboratory before 1700 to arrange handling. If the specimen is ready after 1700, call the Pathologist on-call.Saturday-Sunday
1. Place the specimen in a dry specimen container.
2. Cover the specimen in RPMI.
3. Seal the container and insert it into a specimen transport bag.
4. Fill out a Patient Surgical Requisition and insert it into the side pocket of the specimen transport bag.
5. Hold the specimen in a 4° Celsius refrigerator until the courier arrives for pick-up on Monday. Call and alert the Laboratory to ensure timely pick-up.
Reminder: These specimens are to be kept moist with saline-soaked gauze.
DO NOT SUBMERGE IN SALINE.
* Products of Conception/Fetal Tissue for general histology processing can be submitted in formalin. Hold for courier pick-up.
* Fetal Remains for Autopsy must be kept fresh. -
GYN Specimen Submission
PURPOSE
To establish proper protocol for routine GYN cytologic specimens and STI screening.
QC
Collections performed incorrectly are at great risk of being rejected/returned for correction or recollection. Collection and submission instructions must be followed exactly.
PROCEDURE
A. ThinPrep™ Pap Test
1. Collection Device/Specimen Type
a. ThinPrep™ Pap Test Vial
b. Use either a broom or a brush/spatula collection device
2. Collection Procedure – ThinPrep™ Broom
a. Obtain an adequate sampling from the cervix using the brook-like device.
i. Insert the central bristles of the broom into the endocervical canal deep enough to allow the shorter bristles to fully contact the ectocervix.
ii. Push gently and rotate the broom in a clockwise direction five times.
b. Rinse the broom as quickly as possible into the PreservCyt® solution vial by pushing the broom into the bottom of the vial at least ten times, forcing the bristles apart. Swirl the broom vigorously to further release material. Discard the collection device.
c. Tighten the cap so that the torque line on the cap passes the torque line on the vial.
d. Label the vial with the patient’s name, identification number, and at least one other patient identifier (e.g. birth date.)
e. Completely fill out the Precision Pathology Women’s Health or Molecular Diagnostics Requisition.
f. Put the specimen and requisition in a specimen bag for transportation.
g. According to the facility’s courier set-up, call for a pick-up or wait for the scheduled pick-up time.
3. Collection Procedure – ThinPrep™ Brush and Spatula
a. Obtain an adequate sampling from the ectocervix using a plastic spatula.
b. Rinse the spatula as quick as possible in the PreservCyt® solution vial by swirling the spatula vigorously in the vial at least ten times. Discard the spatula.
c. Obtain an adequate sampling from the endocervix using an endocervical brush device:
i. Insert the brush into the cervix until only the bottommost fibers are exposed.
ii. Slowly rotate a quarter or half turn in one direction; DO NOT OVER-ROTATE
d. Rinse the brush as quickly as possible in the PreservCyt® solution by rotating the device in the solution at least ten times while pushing against the PreservCyt® vial wall. Swirl the brush vigorously to further release material. Discard the brush.
e. Tighten the cap so that the torque line (black mark) on the cap passes the torque line on the vial.
f. Label the vial with the patient’s name, identification number, and at least one other patient identifier (e.g., birth date.)
g. Completely fill out the Precision Pathology Women’s Health or Molecular Diagnostics Requisition.
h. Put the specimen and requisition in a specimen bag for the transportation.
i. According to the facility’s courier set-up, call for a pick-up or wait for the scheduled pick-up time.
4. Procedural Notes
a. Do not use Endocervical brush on pregnant patients, inflamed or infected tissues, or to sample the endometrium.
b. ThinPrep™ is not a diagnostic test; it is a screening procedure designed only to detect cancerous and pre-cancerous lesions. -
Whole Blood or Plasma Specimens for PCR
PURPOSE
To establish proper protocol for routine whole blood or plasma specimens.QC
1. Collections performed incorrectly are at great risk of being rejected/returned for correction or recollection. Collection and submission instructions must be followed exactly.
2. Whole blood must be collected into K2 EDTA blood tubes and separated into plasma within 8 hours.
3. If possible, it is best to hold whole blood and plasma at 2-8°C until courier pickup.
4. If courier is unable to pick up same day, separated plasma should be frozen at -20°C until picked up. Plasma can be held at 2-8°C for up to 3 days or room temperature(15-30°C) for 1 day. Avoid multiple freeze thaws.
5. Do Not Freeze Whole Blood
6. At least 2 mL of plasma is needed for PCR testing. If possible separate 6 mL plasma into three separate 3 separate 15 mL conical tubes.PROCEDURE
A. Blood Collection Procedure
1. Following the standard phlebotomy venipuncture technique, blood is drawn from a vein, usually from the inside of the elbow.
2. Collect at least 4mL of whole blood in a plastic K2 EDTA blood collection tube. 3 tubes are preferred.
3. Invert the collected blood 3-5 times.
4. Label the tubes with the patient’s name and at least one other identifier (e.g. birth date) and label the date and time of collection.
5. Parafilm the lids of the blood tubes.
6. Completely fill out the Precision Pathology Requisition.
7. Put the specimen and requisition in a specimen bag for transportation.
8. According to the facility’s courier set-up, call for a pick-up or wait for the scheduled pick-up time
9. Fill out the Courier Specimen Transport Log with the matching patient information listing the total amount of blood tubes collected. If the specimens are held in the refrigerator, please indicate on the Log.B. Plasma Separation Procedure
1. After completing steps 1-4 outlined above proceed to separating plasma by centrifugation.
2. Place 4-12 mL of whole blood into a 15 mL conical tube or place patient EDTA tubes into appropriate centrifuge bucket inserts.
3. Centrifuge at room temperature for 15 min at 1,300 x g.
4. At this point the plasma layer should be clear to hay colored at the top with the red blood cells on the bottom, and a thin buffy coat layer of white blood cells and platelets in between.
5. Carefully collect the plasma layer with a disposable pipet without disturbing the buffy coat layer.
6. Aliquot the 2 ml volume into a prelabeled (see step 4 for whole blood) 15 ml conical for testing and any remaining 2 ml aliquots into additional prelabeled 15 ml conical tubes. Keep these separated plasma samples at 2-8°C for testing and place at -20°C if longer storage is necessary. Complete steps 5-9 above. -
Bacterial Vaginitis Panel Submission
PURPOSE
To establish proper protocol for collection of Bacterial Vaginitis panels for molecular testing.INTENDED USE
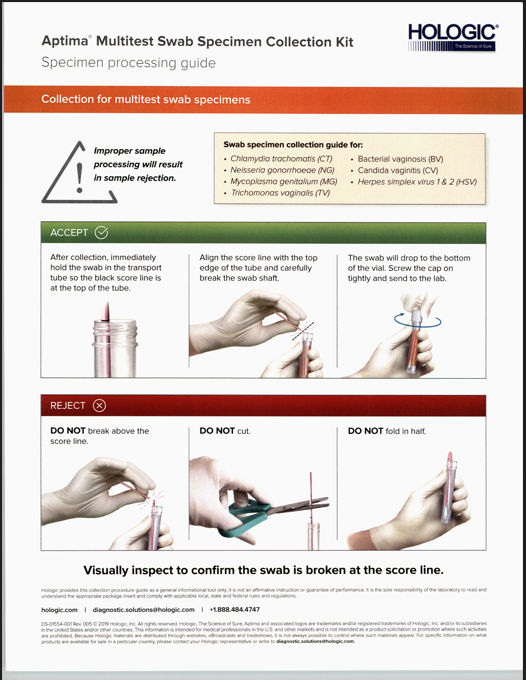
Aptima Multitest swabs either clinician or patient collected vaginal swabs are to be used with Aptima BV Assay. Patient-Collected vaginal swab specimens are an option for screening women when a pelvic exam is not otherwise indicated. The Aptima Multitest Swab Specimen Collection Kit has not been evaluated for home use. The Aptima Multitest Swab Specimen Collection Kit for Multitest Swab Specimens is also intended for use with other clinical specimen material for processing extraction, and analysis with other Hologic products as specified in their labeling.QC
1. Collection and submission instructions must be followed exactly.
2. Collections performed incorrectly will be rejected and returned for correction or recollection.
3. Please see collection instructions by scanning QR code on Aptima Multitest Swab package (newer collection devices)
4. Do not apply the specimen transport medium directly to skin or mucous membranes or take internally. Specimens may be infectious. Use Universal Precautions when handling specimens. Only personnel adequately trained in handling infectious materials should be permitted to handle specimens.
5. Take care to avoid cross-contamination during the specimen handling steps, Specimens can contain extremely high levels of pathogens. Ensure that specimen containers do not contact one another, and discard used materials without passing over the containers. If gloves touch the specimen, change gloves to avoid cross-contamination.
6. If the contents of the transport tube are spilled at any time during the collection procedure use a news Aptima Multitest Swab Specimen Collection Kit. Failure to use a new kit may invalidate the test results.
7. Maintain proper storage conditions during specimen shipping to ensure the integrity of the specimen. Specimen stability under shipping conditions other than those recommended has not been evaluated.
8. Do not use the kit after its expiration date to collect specimens.
9. Be sure to label the specimen according to Transport Container/Specimen section below and indicate on the requisition the appropriate clinical data and collection site.Temperature and Stability
Only the following storage condition should be used for specimens with the Aptima BV assay.
1. After collection, swab specimens in transport tubes can be stored at 2°C to 8°C for up to 30 days. If longer storage is needed, specimens may be stored at -20°C or -70°C for an additional 60 days.
2. After collection, swab specimens in transport tubes may be stored at 15°C to 30°C for up to 30 days.
Note: Specimens must be shipped in accordance with the applicable national and international regulations.REJECTION CRITERIA
Specimens submitted in any of the following manner will be rejected:
– Unlabeled Specimen Container
– Mislabeled/Unlabeled Requisition
– Missing Requisitions
– Vial submissions with no swab, extra swabs, or incorrect swab
– Swabs cut or broken above the score line or that have been folded in half
– Insufficient fluid levels
– Specimen past stability
– Expired media
– Male specimensTRANSPORT CONTAINER/SPECIMEN
Vaginal specimen may be clinician or patient collected on the Aptima Multi-Test Swab (orange label) using the provided individually wrapped, sterile swab.Specimen transport tube containing 2.9 mL Specimen Transport Medium (STM) and properly collected specimen swab broken at score mark with properly tightened screw top foil sealed lid should be submitted for Aptima BV testing.
Collection instructions may appear on packaging or found electronically using QR code (newer collection devices).
Each specimen should be labeled with 2 patient-specific identifiers:
1. Patient full name with middle initial.
2. Date of Birth.MULTI-TEST SWAB COLLECTION PROCEDURE
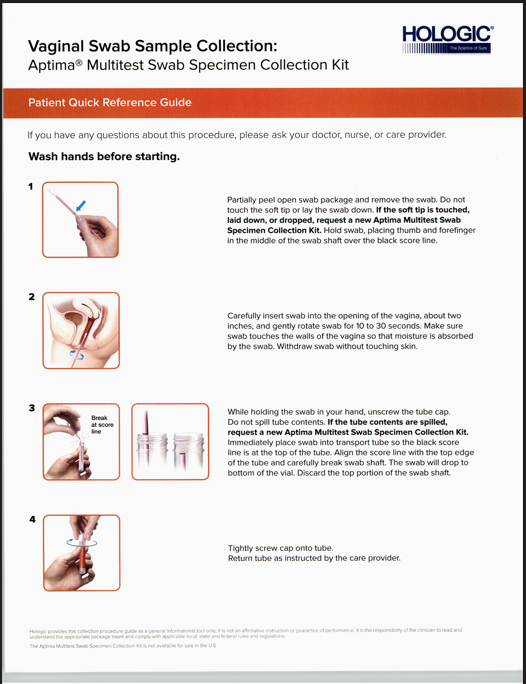
Note: For patient-collected vaginal swab specimen collection, ensure that the patients read the Patient Collection Instructions before providing them with a collection kit.Instructions for vaginal swab specimen collection:
1. Wash hands before starting and wear gloves.
2. Label the container with the patient’s full name and middle initial along with their date of birth.
3. Partially peel open the swab package. Remove the swab. Do not touch the soft tip or lay the swab down. If the soft tip is touched, the swab is laid down, or the swab is dropped, use a new Aptima Multitest Swab Specimen Collection Kit.
4. Hold the swab, placing thumb and forefinger in the middle of the swab shaft covering the score line. Do not hold the shaft below the score line.
5. Carefully insert the swab into the vagina about two (2) inches past the introitus and gently rotate the swab for 10 to 30 seconds. Make sure the swab touches the walls of the vagina so that moisture is absorbed by the swab and then withdraw the swab without touching the skin.
6. While holding the swab in the same hand, unscrew the cap from the tube. Do not spill the contents of the tube. If the contents of the tube are spilled, use a new Aptima Multitest Swab Specimen Collection Kit.
7. Immediately place the swab into the transport tube so that the score line is at the top of the tube.
8. Carefully Break the swab shaft at the score line against the side of the tube.
9. Immediately discard the top portion of the swab shaft.
10. Tightly screw the cap onto the tube.
11. Completely fill out the Precision Pathology Services Women’s Health Requisition.
12. Put the specimen and requisition in a specimen bag for transportation.
13. According to the facility’s courier set-up, call for a pick-up or wait for the scheduled pick-up timeNOTES
For Further Reference and Guidance for how to collect by clinician, please see link below for an instructional video
https://www.youtube.com/watch?v=b5QohVJiPZ8&list=PLo7ieND16BBw9GCED35qjhCWE-eiR67z&index=16
This link can also be found on our PPS website https://www.precisionpath.us/providers/clinician-collection-guidesSee the attached patient collection guides.
Important Information to consider: IF PREGNANT, PLEASE INFORM PLEASE INFORM YOUR HEALTH-CARE PROVIDER
Before collecting the vaginal swab specimen, inform your healthcare provider if you have:
1. Recent pelvic pain
2. Pain with sexual intercourse
3. Unusual vaginal discharge or bad odor
These symptoms can be due to pelvic inflammatory disease (PID). Prompt diagnosis and treatment of PID can help prevent infertility and ectopic pregnancy associated with PID.REFERENCES
Aptima Multitest Swab Specimen Collection Kit AW-14413-001 Rev.010
Aptima BV Assay W-1881-001 Rev.003
PPS Collection Procedure 3000.000 Collection Manual Overview
Hologic Swab Specimen Collection Guide DS-01554-001 Rev.005
Hologic Patient Quick Reference Guide DS-08579-001 Rev.002
PPS Lab General Procedure 008.000 Receiving and Handling/ Accessioning of Specimens
Instructions for Using the Aptima Multitest Swab Specimen Collection Kit for Patient-Collected Specimens AW-16968 Rev.0034

-
CV/TV Submission
PURPOSE
To establish proper protocol for collection of CV/TV assays for molecular testing.QC
Collection and submission instructions must be followed exactly.
Collections performed incorrectly will be rejected and returned for correction or recollection.Temperature and Stability
Room temperature, fourteen (14) days.REJECTION CRITERIA
Specimens submitted in any of the following manner will be rejected:
– Vial submissions with no swab, extra swabs, or incorrect swab
– Used swab not supplied by Hologic
– Insufficient fluid levels
– Specimen past stability
– Expired mediaTRANSPORT CONTAINER/SPECIMEN
Vaginal specimen collected on the Aptima Multitest Swab (orange label) OR Aptima Unisex Swab (white label) OR cervical/endocervical specimen collected in a ThinPrep vial.COLLECTION PROCEDURE
A. Multitest Swab Collection
1. Label the container with the patient’s name and at least one other patient identifier (e.g. birth date).
2. Insert the swab approximately two inches into the vagina and rotate for 10-30 seconds. Ensure the swab touches the walls of the vagina so that moisture is absorbed.
3. Withdraw the swab without touching the surrounding skin.
4. Immediately place the swab into the transport tube.
5. Carefully break the swab into the transport tube.
6. Cap the specimen transport tube tightly.
7. Completely fill out the Precision Pathology OBGYN Requisition.
8. Put the specimen and requisition in a specimen bag for transportation.
9. According to the facility’s courier set-up, call for a pick-up or wait for the scheduled pick-up time.B. Unisex Swab Collection(Female)
1. Label the container with the patient’s name and at least one other patient identifier (e.g. birth date).
2. Insert the swab approximately two inches into the vagina and rotate for 10-30 seconds. Ensure the swab touches the walls of the vagina so that moisture is absorbed.
3. Insert the specimen collection (blue shaft) into the endocervical canal and rotate for 10-30 seconds to ensure adequate sampling.
4. Withdraw the swab carefully, avoiding contact with the vaginal mucosa.
5. Carefully break the swab into the transport tube.
6. Cap the specimen transport tube tightly.
7. Completely fill out the Precision Pathology OBGYN Requisition.
8. Put the specimen and requisition in a specimen bag for transportation.
9. According to the facility’s courier set-up, call for a pick-up or wait for the scheduled pick-up time.C. ThinPrep Pap Vial Collection
1. Label the container with the patient’s name and at least one other patient identifier (e.g. birth date).
2. Collection the gynecological sample from the cervix/endocervix using broom-type or cytobrush/spatula sampling device.
3. Twirl or swish device into a ThinPrep vial containing PreservCyt Transport medium. Note: Discard the collection device; do not leave in vial.
4. Cap the vial tightly.
5. Completely fill out the Precision Pathology OBGYN Requisition.
6. Put the specimen and requisition in a specimen bag for transportation.
7. According to the facility’s courier set-up, call for a pick-up or wait for the scheduled pick-up time. -
Herpes Simplex Virus 1 & 2 Submission
PURPOSE
To establish proper protocol for collection of Herpes Simplex Virus 1 & 2 specimens for molecular testing.QC
Collection and submission instructions must be followed exactly. Collections performed incorrectly will be rejected and returned for correction or recollection.Temperature and Stability
– Specimens may be transported and stored at 2°C to 30°C until tested.
– Specimens must be tested with Aptima HSV 1 & 2 assay within 30 days of collection.
– Specimens stored at-20°C to -70°C for up to 36 days may also be tested with the Aptima HSV 1 & 2 assay.
– Following transfer to the Aptima Specimen Transfer Tube, VTM specimens may be frozen and thawed up tp 3 times prior to testing.REJECTION CRITERIA
Specimens submitted in any of the following manner will be rejected:
– Vial submissions with no swab, extra swabs, or incorrect swab
– Used swab not supplied by Hologic
– Insufficient fluid levels
– Specimens past stability
– Expired mediaTRANSPORT CONTAINER/SPECIMEN
Male OR female anogenital lesion specimen collection samples on the Aptima Multitest Swab (for STM)(orange label).COLLECTION PROCEDURE
A. Clinician Collected
1. Label the container with the patient’s name and at least one other patient identifier (e.g. birth date)
2. Following appropriate PPE protocols, open the swab package and remove the swab.
3. Do not touch the soft tip or lay the swab down.
*If the soft tip is touched, laid down, or dropped, discard and get a new Aptima Multitest Swab Specimen Collection Kit.
4. Hold the swab, placing thumb and forefinger in the middle of the shaft covering the black score line.
5. Do not hold the shaft below the score line.
6. Vigorously swab the base of the lesion to absorb fluid, being careful not to draw blood.
7. Withdraw the swab carefully without touching the surrounding area.
8. While holding the swab in hand, unscrew the tube cap. Careful not to spill the tube contents.
*If the tube contents are spilled, discard and replace with a new Aptima Multitest Swab Specimen Collection Kit.
9. Immediately place the swab shaft at the score line, the swab will drop at the bottom of the vial. Discard the top portion of the shaft.
10. Carefully break the swab shaft at the score line, the swab will drop at the bottom of the vial. Discard the top portion of the shaft.
11. Cap the specimen transport tube tightly.
12. Completely fill out the Precision Pathology OBGYN Requisition
13. Put the specimen and requisition in a specimen bag for transportation.
14. According to the facility’s courier set-up, call for pick-up or wait for the scheduled pick-up time.B. Patient Self Collection
Please see the diagram of the Hologic, Inc. Aptima Multi Test Swab Specimen Collection Guide for: Herpes Simplex Virus (HSV) types 1 & 2
REFERENCES
DS-09479-001 Rev. 001 Copyright Hologic Inc. All rights reserved. Hologic, The Science of sure Aptima and associated logos are trademarks of Hologic Inc. and/or it’s subsidiaries in the United States and other countries. -
Trichomonas Vaginalis Submission
PURPOSE
To establish proper protocol for collection of Trichomonas Vaginalis specimens for molecular testing.QC
Collection and submission instructions must be followed exactly.
Collections performed incorrectly will be rejected and returned for correction or recollection.Temperature and Stability
– Specimens may be transported and stored at 2°C to 30°C until tested.
– Specimens must be tested with the Aptima HSV 1 & 2 assay within 30 days of collection.
– Specimens stored at -20°C to -70°C for up to 36 days must also be tested with the Aptima HSV 1 & 2 assay.
– Following transfer to the Aptima Specimen Transfer Tube, VTM specimens may be frozen and thawed up to 3 times prior to testing.REJECTION CRITERIA
Specimens submitted in any of the following manner will be rejected:
– Vial submissions with no swab, extra swabs, or incorrect swab
– Used swab not supplied by Hologic
– Insufficient fluid levles
– Specimen past stability
– Expired mediaTRANSPORT CONTAINER/SPECIMEN
Female Specimen Collection
– Aptima Multitest Swab (orange label)
– Aptima Unisex Swab (white label)
– Aptima Urine tube (yellow label)
– ThinPrep vial for cervical/endocervical specimenMale Specimen Collection
– Aptima Unisex Swab (white label)
– Aptima Urine tube (yellow label)COLLECTION PROCEDURE
A. Multitest Swab Collection
1. Label the container with the patient’s name and at least one other patient identifier (e.g. birth date).
2. Insert the swab approximately two inche into the vagina and rotate for 10-30 seconds. Ensure the swab touches the walls of the vagina so that moisture is absorbed.
3. Withdraw the swab without touching the surrounding skin.
4. Immediately place the swab into the transport tube.
5. Carefully break the swab shaft at the score line.
6. Cap the specimen transport tube lightly.
7. Completely fill out the Precision Pathology OBGYN Requisition.
8. Put the specimen and requisition in a specimen bag for transportation.
9. According to the facility’s courier set-up, call for pick-up or wait for the scheduled pick-up time.B. Unisex Swab Collection (Female)
1. Label the container with the patient’s name and at least one other patient identifier (e.g. birth date).
2. Remove excess mucus from the cervix and surrounding mucosa using the cleaning swab (white shaft).
Note: Discard this swab, do not include it in vial.
3. Insert the specimen collection swab (blue shaft) into the endocervical canal and rotate for 10-30 seconds to ensure adequate sampling.
4. Withdraw the swab carefully, avoiding contact with the vaginal mucosa.
5. Immediately place the swab into the transport tube.
6. Carefully break the swab into the transport tube.
7. Cap the specimen transport tube tightly.
8. Completely fill out the Precision Pathology OBGYN Requisition.
9. Put the specimen and requisition in a specimen bag for transportation.
10. According to the facility’s courier set-up, call for pick-up or wait for the scheduled pick-up time.C. Unisex Swab Collection (Male)
1. Label the container with the patient’s name and at least one other patient identifier (e.g. birth date).
2. The patient should not urinate at least one hour prior to sample collection.
3. Insert the specimen collection swab (blue shaft) 2-4 cm into the urethra and rotate for 2-3 seconds.
4. Immediately place the swab into the transport tube.
5. Carefully break the swab into the transport tube.
6. Cap the specimen transport tube tightly.
7. Completely fill out the Precision Pathology OBGYN Requisition.
8. Put the specimen and requisition in a specimen bag for transportation.
9. According to the facility’s courier set-up, call for pick-up or wait for the scheduled pick-up time.D. Urine Collection (Male or Female)
1. Label the container with the patient’s name and at least one other patient identifier (e.g. birth date).
2. Collect urine in urine collection cup.
3. Allocate 2 ml of urine into Urine Aptima tube; the fluid level should be between the black fill-lines.
4. Cap the specimen transport tube tightly.
5. Completely fill out the Precision Pathology OBGYN Requisition.
6. Put the specimen and requisition in a specimen bag for transportation.
7. According to the facility’s courier set-up, call for pick-up or wait for the scheduled pick-up time.E. ThinPrep Pap Vial Collection
1. Label the container with the patient’s name and at least one other patient identifier (e.g. birth date).
2. Collect the gynecological sample from the cervix/endocervix using the broom-type or cytobrush/spatula sampling device.
3. Twirl or swish the device into a ThinPrep vial containing PreservCyt Transport medium.
Note: Discard the collection device; do not leave in vial.
4. Cap the vial tightly.
5. Completely fill out the Precision Pathology OBGYN Requisition
6. Put the specimen and requisition in a specimen bag for transportation.
7. According to the facility’s courier set-up, call for a pick-up or wait for the scheduled pick-up time. -
Microbiology Specimen Submission
PURPOSE
To establish a protocol for handling microbiology specimen collection devices including:
• BD BBL™ Culture Swab™ Plus
• BD Viral Transport
• BD Vacutainer® Urine Transport
• Sterile Tubes
• Sterile Saline Tubes
• Copan eSwab™QC
ICD-10 codes must be provided on the Requisition in order to process Microbiology Specimens.
PROCEDURE
Specimen Preparation for Microbiology
To report medically relevant results, the Specimens sent by Clients and received into the Microbiology Laboratory must be properly collected. The Microbiologist has little control over the quality of specimens received. Bearing this in mind, it is imperative to assist Clients with specimen collection questions. The List of Samples for Collection lists sample collection guidelines for Clients and should be utilized as a very important reference. It is to be available to all Microbiology Laboratory Personnel.
1. All samples received for processing must adhere to the following basic criteria:
a. Utilize Sterile Containers.
b. Label specimen containers properly with specific sources for wounds and type of collection for urines. (i.e. decubitis left great toe; ear, skin lesion left forearm; cath; etc.)
c. Utilize proper Transport Media for culture type. (i.e. culturette for routine aerobic wounds; BD culturette transport for urogenital sources; anaerobic transport for anaerobic samples)
d. Transport in the proper temperature environment.2. Specimens recommended for General Microbiology testing:
a. Deep or post-operative exudates and drainages for wounds.
b. Clean catch, midstream urines – First morning void preferred, catheterized (avoid random urine collections)
c. Venous or arterial for Catheter
d. Suprapubic Aspirate
e. Sputum (lower respiratory secretions) for Respiratory – First morning preferred or aspirated sputum
f. Pharyngeal Swab (Vigorously swab tonsillar area, NOT the tongue)
g. Nasopharyngeal Swab
h. Bronchial Wash
i. Transtracheal Aspiration
j. Fine Needle Aspiration
k. Ear (Otitis Media)
l. Eye (Lacrimal duct, corneal scrapings)
m. Skin – Discard surface debris and clean around the lesion with a skin disinfectant. Collect a Swab or Aspirate from inside the lesion
n. Body fluids – These are normally sterile fluids. Collect aspirates using an aseptic technique.
o. Abscesses – Purulent aspirate plus sample from the side wall of the abscess
p. Genitourinary Tract – Use a Swab in the approved Transport Media
q. Stool submitted in the correct fixative/containers at room temperature.
r. Stool for C.Diff submitted fresh and sent immediately to the laboratory for testing. If not able to reach the lab within 72hrs, C.Diff stool specimens should be frozen.3. Specimens not recommended for General Microbiology testing:
a. Urines that are very dilute, with low specific gravity.
b. Urines that are not transferred to a BD Urine Vacutainer™.
c. Urines that are not refrigerated, if delayed in sample receipt and processing.
d. Sputum mixed with an abundance of saliva, as evidenced by the Gram’s Stain evaluation
e. Stool samples that are not placed in preservative, when there is a delay in reaching the Laboratory – (pathogens are overgrown by normal flora)4. Anaerobic Specimen(s) – Preferred
a. Abscess or deep wound, tissue, normally sterile body fluids other than blood
b. Transtracheal aspirations
c. Bronchoscopic specimens obtained by the Double Lumen technique
d. Suprapubic urine aspirates obtained from bladder, nephrostomy tube or suprapubic catheterization
i. Genital specimens from these sites only
ii. Cul-de-sac aspiration
iii. Culdocentesis
iv. Transfundal aspiration
v. Placenta
vi. Fallopian tube
vii. Intrauterine devices
viii. Surgical specimens
e. Exudates
f. Aspirated pus from deep wound or abscesses
g. Tympanocentesis fluid5. Rejection Criteria for Anaerobic Specimen(s):
a. Specimens received in expired media or frozen
b. Specimens not submitted in anaerobic transport media/device
c. Specimens collected from the following sites:
i. Superficial wounds
ii. Throat
iii. Nasopharyngeal
iv. Feces/rectal swabs
v. Urine (catheter or voided)
iv. Vaginal
v. Cervical
vi. External ear
vii. External eye
viii. Sputum/Bronchoscopic specimens not collected by Double Lumen technique6. Specific Collection Guidelines
a. Use a sterile, appropriate collection media. Ensure that the collection media has not exceeded the expiration date.
b. Label the collection media with at least two Patient Identifiers. Always submit all specimens with the patient’s full name and DOB. Other acceptable patient identifiers are Social Security Number and/or Medical Record Number.
c. Record the date and time collected on the requisition or the specimen container.
d. Collect the specimen prior to initiating antibiotic therapy.
e. To prevent deterioration of pathogens, deliver all specimens in a timely manner. It is recommended that collection time to setup time for all specimens is less than 24 hours.
f. Urines collected in a BD Vacutainer™ can be refrigerated for up to 2 days but should be delivered for processing within 48 hours of collection.
g. Refrigeration can deteriorate or inhibit growth of some pathogens. Collection swabs should always be at room temperature and submitted within 48 hours of collection.
h. Always specify on the requisition the specimen collection site. Specify as right or left side if applicable.7. Smears
a. Some Clinicians may choose to recover exudates for Gram Stain immediately at the time of surgical or wound management procedures.
b. Label the frosted end of the slide with the Patient’s name and a second Patient Identifier. Smear a thin layer of specimen on the slide and allow the slide to thoroughly air-dry. Collate this slide with any other corresponding culture specimens and prepare for transport to the Laboratory in a labeled slide holder.NOTES:
* If the individual slides are not labeled, the specimen will be returned to the Clinician for labeling. This is compliant with CAP and CLIA guidelines on specimen labeling.
* DO NOT use slide holders for any specimens other than smears, as these containers are not sterile. Be sure to allow any slides to dry before placing them in the transport slide container.8. Specific Use of Collection Equipment
a. BD BBL™ Culture Swab™ Plus (BLUE TOP):
Note: Blue tops are optimal for recovery of both anaerobic and aerobic organisms.
i. Ensure that the collection swab has not exceeded expiration date.
ii. Remove swab from package and take care to employ aseptic technique. Aseptic technique means avoiding contamination of the swab coming into contact with work surfaces.
iii. Discard top cap of collection tube.
iv. Collect specimen and place swab into the gel transport medium. Make certain swab is submerged in the gel transport media for better organism recovery.
v. Maintain at room temperature throughout transport interval and submit within 48 hours of collection.
vi. Before submitting specimen, ensure the specific collection guidelines in section 6 have been followed.
b. BD Viral Transport for Viruses, Chlamydiae, Mycoplasmas and Ureaplasmas:
i. Ensure that the collection container has not exceeded expiration date.
ii. Peel apart plastic packaging and discard.
iii. Remove and utilize one of the swabs provided for aseptic collection of sample. The smaller rod-like swab should only be used for chancres or genital ulcers on male patients.
iv. After collection of specimen, remove red cap from viral transport tube and insert swab. Submerge the swab into the media and break off swab shaft by bending the shaft against the rim of the tube.
v. Recap the tube securely.
vi. More than one tube may be submitted if more than one type of viral culture is requested to ensure adequate specimen for culture set-ups.
vii. Transport immediately to the lab at 2-30°C within 24 hours.
viii. Before submitting specimen, ensure the specific collection guidelines in section 6 have been followed.
c. BD Vacutainer® Urine Transport:
i. Ensure that the collection container has not exceeded expiration date.
ii. First collect urine specimen according to clean catch procedure for male or female.
iii. Remove the straw and vacutainer tube from the package using care not to contaminate this collection device.
iv. Do not place on workbench. This will contaminate the collection device.
v. Immediately upon removal from the package insert the tip of straw transfer device into the urine specimen cup and insert the Vacutainer tube in holder portion of straw device.
vi. Push the vacutainer all the way into the holder. The vacuum of the tube will aspirate the urine into the collection device.
vii. Transfer device should be discarded in sharps container after use.
viii. Shake tube vigorously after collection.
ix. Refrigerate if not immediately transported to lab. Submit refrigerated specimen no later than 48 hours after collection.
x. Before submitting specimen, ensure the specific collection guidelines in section 6 have been followed.
d. Sterile Tubes
i. Utilized for placing various specimens needed for culture, (i.e. toenail clippings, skin scrapings, and small tissues).
ii. Specimens submitted in unsterile containers for culture are not suitable and will be rejected.
ii. Transport at room temperature within 24 hours after collection.
iii. Before submitting specimen, ensure the specific collection guidelines in section 6 have been followed.
e. Sterile Saline Tubes
i. Used for Acanthamoeba (Culture)
ii. Preferred specimens: Eye Wash; Corneal Biopsy; Contact Lens/Fluid; cerebral; lung-collected aseptically
iii. Transport at room temperature within 24 hours after collection.
iv. Before submitting specimen, ensure the specific collection guidelines in section 6 have been followed.
f. Copan eSwab™ (Test is sent to Avero Diagnostics)
i. Utilized for Group B Streptococcus (GBS) RT-PCR
ii. Wipe away excess secretions or discharge from the vaginal area.
iii. Insert the swab into the lower third part of the vagina, and sample secretions from the mucosa.
iv. Insert the same swab approximately 2.5cm beyond the anal sphincter and rotate to sample anal crypts.
v. Immediately place the swab into the transport tube.
vi. Carefully break the swab shaft at the score line.
vii. Cap the specimen transport tube tightly.
viii. Label the container with the patient’s name and at least one other patient identifier (e.g. birth date).
ix. Completely fill out the Precision Pathology Requisition.
x. Put the specimen and requisition in a specimen bag for transportation.
xi. According to the facility’s courier set-up, call for a pick-up or wait for the scheduled pick-up time9. Unacceptable Specimen Criteria:
a. Excessive time between collection of specimens and delivery to the laboratory. Most specimens have a 24-hour transport limit. Urines should be held for no more than 48 hours if refrigerated. This practice of holding urines for this extended time is not recommended and can cause great discomfort to the patient since it will delay treatment of bladder and urinary tract infections.
b. Improper Labeling: If specimen is missing two patient identifiers or requisition and specimen label are discrepant or incomplete, the collection staff will be asked to correct.
c. Dry Culturette swab: Transport media ampule unbroken
d. Grossly leaking or contaminated specimen container: Biologic hazard
e. Inappropriate specimens including:
i. Specimens for anaerobic culture containing aerobic normal flora (e.g. mouth, skin, vagina, bowel).
ii. Urinary tract catheter or tip.
iii. Gastric contents for bacteriology (except neonates)
iv. Samples received in a syringe with the needle still attached.
v. Specimens received in non-sterile containers.
vi. Stools for ova and parasites from patients who have received certain exogenous substances.
vii. Insufficient quantity of specimen received for tests requested.
f. If a specimen is found to be unacceptable, testing will not be performed, and the collection staff will be notified. Documentation in the specimen return log will be performed for all unacceptable specimens and will be monitored on the pre-analytical action report on a monthly basis.10. Safety:
a. Collect and transport all specimens in keeping with the type of isolation in use at the time of sampling.
b. Transport all specimen types to lab in appropriate biohazard transport bag.
c. Make sure the cap or lid is secure on each specimen transport device to prevent possible leakage or spillage.
d. If a specimen leaks, dispose of according to your institutions’ implemented biohazard waste disposal procedures and recollect specimen.
e. If a specimen is dropped so that the contents leak onto an environmental surface:
i. Put on a pair of gloves.
ii. Handle the specimen as contaminated trash
iii. Clean the affected surface with 10% bleach or disinfectant wipe.
iv. Recollect specimen11. Transport Conditions: Please refer to section 8 “Specific Use of Collection Equipment” for individual transport conditions.
12. Maximum transport time is 24 hours to 48 hours. Specimens held up to 72 hours such as weekend collection contingency will be processed but a disclaimer will be issued for sub-optimal recovery conditions.
Your marketing representative will provide detailed collection instructions and any changes or problems to collection methods. The marketing representative will also provide contact numbers for pick-up, collection media, requisitions, and lock boxes upon request.
REFERENCES
Collection instructions from https://www.labcorp.com/wps/portal/provider/testmenu
Collection instructions from Avero Diagnostics. 6221 Riverside Drive, Suite 119, Irving, Texas 75039. ph: (877) 232-9924